How to Measure a Pool
Introduction
This page is a brief introduction on how to measure a pool using the A-B triangulation method. This method can be used to measure any pool shape, but is primarily targetted at measuring freeform pools.
If you are already familiar with how to measure pools using the A-B triangulation method, then you should find that you already know how to measure pools with Pool Measure Pro. The order in which you take the measurements may be slightly different then what you are used to, but overall the process is the same.
If you are new to measuring pools, Pool Measure Pro will help you through the various steps required and help you to catch common issues and oversights on the spot. And with its intelligent warning system, you can have confidence in your measurements and be sure that you have measured it right the first time.
Measuring a Pool
The following are some basic instructions for measuring a pool with Pool Measure Pro. If you haven't measured a pool before, be sure to talk to your fabricator for any special instructions and helpful hints that they may have to offer.
A-B Pegs
To begin measuring a pool, you will first need to place your A and B reference pegs.
It is important that the A and B pegs be placed such that there is a minimum of 10 feet or 3050 mm between them and, if you were to draw a straight line between them and extend it past both sides of the A and B pegs, that this A-B line does not cross any part of the pool.
If possible, the A-B line should be at least 3' or 1000 mm away from the closest point of the pool or any pool feature or obstacle that you will be measuring. If you are measuring for a replacement safety cover, the A-B line should be at least 3' or 1000 mm away from the existing anchor locations. You will not be able to correctly measure the pool if the A-B line crosses any part of the pool.
Be sure that whatever you use for your A and B pegs is perfectly stationary and will not move. If one of the pegs moves during the measuring process, you will need to set up your A and B pegs again and start your measurements all over again.
Carefully measure the distance between the A and B pegs. This measurement needs to be as accurate as possible. Record this measurement in Pool Measure Pro on the Basics page as the A-B Length input.
When looking at a plot of the pool, Pool Measure Pro assumes that the A and B pegs are placed at the "bottom" of the pool plot and requires that the A peg to be on the left and the B peg on the right. This means that if you were to stand between the A and B pegs and face the pool, the A peg would be to your left and the B peg would be to your right.
Marking Your Points
Using a piece of chalk or other temporary mark, walk around the pool and mark your measuring points around the edge of the pool.
Start by marking the most important points first and then come back and fill in additional points as required. It is recommended that you mark these points in one color and the fill-in points in another. This will help identify these points when you start taking your measurements.
The following are examples of some of the important points that should be marked first. There may be others depending on the style of pool being measured.
- Mark each side of the steps.
- For a liner, mark where the break lines extend to the perimeter of the pool.
- Mark any location where the radius of a corner or arc changes.
- Mark the ends of any straight edges.
- For a safety cover, mark where any water features that will interfere with the cover.
- Mark the points that will later be used for length and width cross pool measurements.
Then go back and add in any required points between these marks. You should have a point, on average, every 2 to 3 feet or 700 to 1000 mm around the pool for smooth and consistent curves. For sharp curves, you may need to place points even closer - at 1 to 2 foot or 300 to 700 mm intervals or even closer. For straight edges, one point between the two end points may be sufficient.


Tips for Rectangular and Other Straight Wall Pools
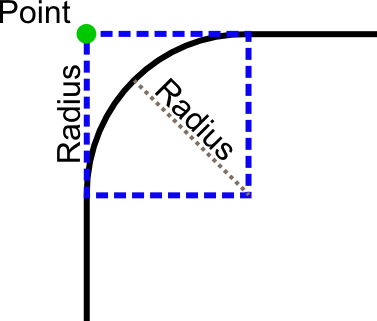
For pools that are rectangular or otherwise constructed with straight walls, you can avoid taking numerous measurements around the curved corners of the pool.
Do this by measuring the point where the straight walls would intersect and note the corner radius in the project comments. The diagram illustrates where to place the point and how to take the radius measurement.
Note that the radius measurement matches the length of the sides of the square shown over the corner.
Pool Perimeter
If measuring for a liner, measure the perimeter of pool. Using one of the tape measures, lay the tape measure along the edge of pool and measure all the way around the pool. The measurement should be taken at the location of the pool wall. See the illustration labelled, Measure to the Pool Wall below, for help understanding where to measure along.
You only need to measure along the top of the pool liner. For example, if the pool has fiberglass steps, do not include the steps in the perimeter measurement - just measure across the front of the steps where the liner goes.
Record the perimeter of the pool in the appropriate location on the Basics page.
Taking Your Measurements
To take your measurements, it is recommended that you have two identical fabric/fiberglass (non-metalic) measuring tapes. Fasten the end of one tape measure to the A peg and the other to the B peg.
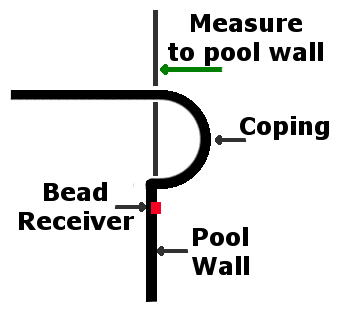
When taking your measurements, it is important that you measure to the correct location. The measurement is from the A or B peg to the pool wall. See the illustration to help identify the location of the pool wall.
Start at the Steps
Start at one side of the steps and work clockwise around the pool. Or if there are no steps, start at the end of one of the break lines.
Take measurements from the A and B pegs and record the measurements on the Measure page of Pool Measure Pro. Check with your supplier, but typically, your measurements should be accurate to the nearest 1/4 inch or 5 mm for liners and 1/2 inch or 10 mm for covers.
After entering the A and B measurements for one of the "important" points (such as the side of a step, a break line point, cross pool measurement point, etc.), tap on its point number on the Measure page and enter an appropriate label for that point. These labels will appear in the reports that are sent to the fabricator and will help them to design a proper fitting product. These labels will also be useful when adding cross pool measurements as discussed below.
Watch the plot of the pool as you enter in your measurements. The plot should follow the shape of the pool as you enter in the measurements. If it doesn't look right, go back and verify your measurements. The earlier you catch any issues or mistakes, the less work it will be to correct them. Also watch the point number for the "Previous Point" shown on the Measure page. A yellow background for a point number indicates an issue with the measurements for that point and you will need to correct it.
Adding Points for Pool Features or Obstructions
Add a feature for any features or obstacles that might affect the shape or construction of the cover or liner. A feature can be a break line, step, cross pool measurement, or any other feature of the pool such as the base of a diving board, a leg for a slide, a permanent hand rail for the steps, a diving rock, etc. You should add a feature/obstacle to the project for each feature or obstacle that you wish to measure.
For example, if you are working on a safety cover project, you will need to add points to feature lines to mark where any pool feature or obstacle may interfere with the cover. An example might be a diving rock placed along the edge of the pool since it cannot be removed before installing the cover. The location of the diving rock must be provided to the fabricator to allow them to adjust the design of the cover to work around the rock.
Features are added from the Basics page or the the Measure page. Tap on the button, to create a new features for the project.
Points are added to the features from the Measure page. A drop-down menu is shown above the plot of the pool. Tapping on this menu will show the list of all available features and the selected feature is shown when the menu is closed.
When new points are added, the points added to the selected feature and will be plotted as they are entered.
Deck Information
For a safety cover, you will need to provide information about the deck around the pool. The Extras page will request information about the type of decking and coping around the pool as well as information about any fiberglass steps that may be present.
Break Lines
If measuring for a liner, add a break line for the break lines in the pool. Measure the points on the perimeter of the pool where the break line would cross the perimeter.
Wall Height and Deep End Depth
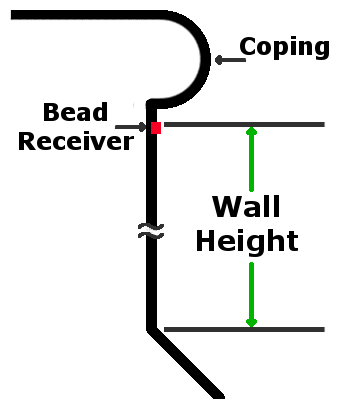
Measure the wall height for the liner. The wall height is measured from the bead receiver to the bottom of the wall. See the following illustration for the wall height measurement.
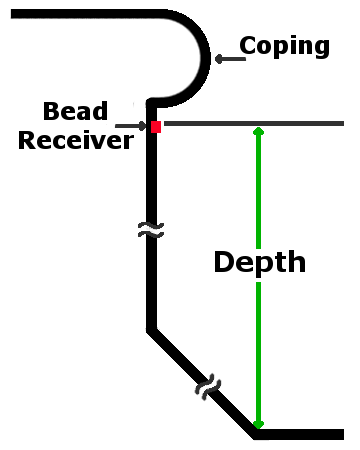
The deep end depth is also measured relative to the bead receiver, but is taken from the deepest portion of the pool. Again, see the following illustration for deep end depth measurement.
Deep End Slopes
For a liner to fit the deep end properly, it is important that the deep end slope measurements be taken correctly.
These measurements are the horizontal distance from the pool wall to the bottom end of the slope. It is not the measurement along the slope.
The following illustrations show how to take the slope measurements.
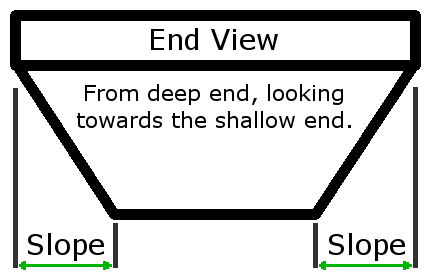

Three slope measurements are required as shown in the following illustration. One measurement is required for each end of the deep end break line and the third measurement is taken at the end of the deep end.

Add Cross Pool Measurements
A cross pool measurement is a length measurement between two points of the pool where the measurement crosses the pool. Typically the length and width of the pool will be good cross pool measurements to include. You might also consider adding cross pool measurements for the break lines and diagonal measurements for any rectangular areas of the pool.
You should supply a minimum of two cross pool measurements for the pool. You can add cross pool measurements from the Basics page or the the Measure page. Give the cross pool measurement a useful, descriptive label and record the measured length of the cross pool measurement. Then add the points for each end of the measurement.
The end points can be added in one of two ways. You may add a new point with its own A and B measurements. Or, if you included these points in your pool perimeter measurements and applied a label to them, you can use the existing point by selecting the pool perimeter as the source feature and selecting the point from the list of available points. Do this for both ends of the cross pool measurement.
Repeat for each cross pool measurement that you are adding.
Add Pictures
The Extras page allows you to add pictures to the project using your device's camera. Add one or more pictures of the pool itself as well as pictures of any steps and of any features or obstructions that were measured.
The pictures can be sent along with the project data to the fabricator to allow them to see the pool like you do.
Completing the Project
After entering all of the other data asked for on the various input pages, proceed to the Review page.
Review the plot and confirm that it is a true representation of the pool and is not flipped or mirrored in any way. Review any warnings that may be listed in the warning box and if needed, go back and correct your data as appropriate to resolve the warnings.
View the report to take a quick look at the data. Review the data presented in the report to confirm that everything appears to have been recorded correctly.
Sending the Project Data to the Fabricator
After you have completed the measurements for the pool, you can proceed to send the reports to the fabricator. From the Review page, tap on the send button. This will take you to an email page.
Most of the email page should already be filled in for you. Review the selections and update as required.
Use the send button on the email page to send the project data to your fabricator.